Outcome
Provision a managed PostgreSQL database, connect the application through generated environment variables, and deploy a healthy release without putting database credentials in the Stackfile.Prerequisites
- The URL of Stackdome Cloud or a self-hosted installation, plus an API token. See authentication and API tokens.
- A repository with a valid
stackfile.yamland the database name and connection-variable contract the application expects. - Enough destination capacity for the requested database size and instances.
- For scheduled backups, an object store configured through the dashboard or API. The public CLI can trigger and list backups, but it cannot register an object store or configure a backup schedule.
Agent prompt
Agent actions
1
Inspect the application
Determine the database name, supported PostgreSQL version, migration command, and whether the application expects one connection URL or separate host, port, database, username, and password variables.
2
Create the addon
Run
stackdome addon postgres create <addon-name> with explicit database, version, instance count, and storage values. Use -o json and retain only non-secret metadata.3
Wait for credentials to be ready
Poll
stackdome addon postgres info <addon-name> -o json with a bounded retry interval. Do not deploy the application until status.state is Ready.4
Connect the Stackfile
Add an
addons mapping to the application resource. Map DATABASE_URL to {{ url }}, or map only the individual outputs the application needs. Do not call the credentials command merely to copy a password into the Stackfile.5
Validate, deploy, and verify
Run
stackdome validate and stackdome deploy --wait -o json; retain the non-empty release.id as the deployed release ID, then run stackdome status -o json. Run migrations through the application’s normal release or startup mechanism, then check application logs for connection failures.Success criteria
stackdome addon postgres info <name> -o jsonreturns the expected addon andstatus.stateasReady.stackdome validateexits successfully with the addon mapping in place.stackdome deploy --wait -o jsonexits successfully, returns a non-emptyrelease.idthat is retained as the deployed release ID, and returnsrelease.stateasReleased.stackdome status -o jsonreturnsconverged_release.idequal to the deployed release ID,converged_release.stateasReleased, andconverged_release.healthasok.- The application completes its database readiness check or migrations without authentication or connection errors, and no credential value appears in the Stackfile or agent response.
CLI and Stackfile workflow
The current CLI supports creating, listing, inspecting, backing up, reading backup history, retrieving credentials, and deleting PostgreSQL addons. Create an instance with explicit values so CLI defaults do not silently choose an incompatible version or database name:Ready, connect it by name in the application resource:
host, port, database, username, password, sslmode, ca_certificate, and url. Map only what the application uses. Stackdome resolves these values during deployment.
Dashboard workflow
An addon is a database Stackdome runs and looks after for you. It lives outside any stack — you create it once from the Addons page, and any resource in any stack can then read its credentials. Postgres is the only addon type available today.This is not the same thing as the Postgres tile in a stack’s + Add resource panel. That tile adds an ordinary resource running thepostgres:16 image: your container, your volume, your problem when it comes to backups and upgrades. An addon is the managed path — Stackdome provisions the database, holds its credentials, and hands out only the fields you ask for.Dashboard prerequisites
- Connected compute on self-hosted Stackdome. An addon is placed on your organization’s compute automatically — the create form has no destination field, and the API rejects
cluster_idbecause it is read-only. See Connect compute. - A compatible storage class on self-hosted Stackdome. The form initially asks for
standard, and the choice cannot be changed after creation. If your cluster uses another name, use the self-hosted note below. - An Object Store, if you want backups. Scheduled backups cannot be enabled without one. See Volumes and object stores.
- An account that can create addons. If yours cannot, the Add Addon button is not rendered at all.
Create an instance
The sidebar lists this under PLATFORM → Addons. The page is headed Addons — “Manage hosted addon services for your stacks” — and reads NO ADDONS YET until you have one.Choose Add Addon. The dialog is Add Addon, “Pick a service to provision for your stacks.”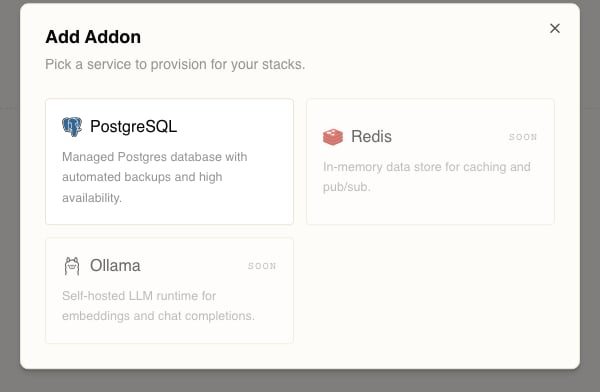
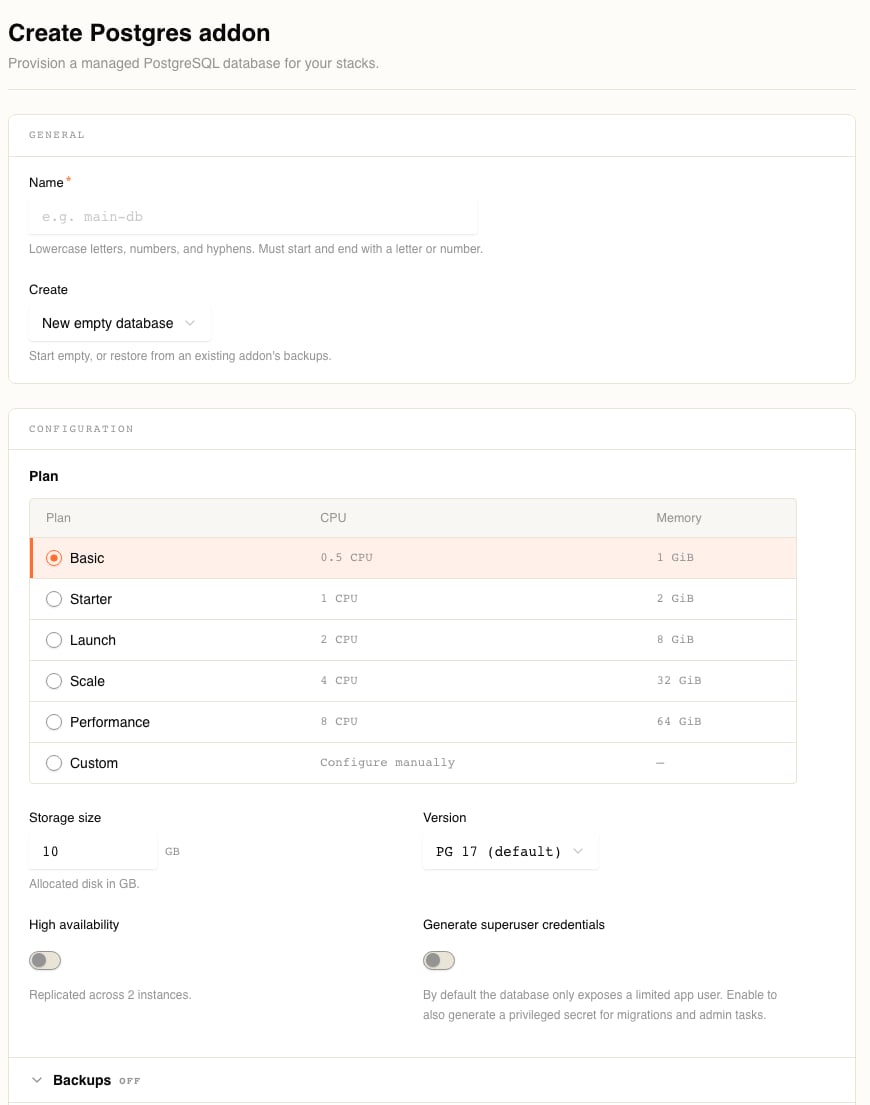
General
Configuration
Plan is a radio table with columns Plan, CPU, Memory. It is a shorthand for CPU and memory requests and limits:The label is the limit; the request underneath it is lower on every plan except memory, where request and limit are equal. Choosing Custom reveals a Custom resources block with four fields — CPU request (
250m), CPU limit (500m), Memory request (512Mi), Memory limit (1Gi), all shown as placeholders. Leave all four empty and you get Set at least one CPU or memory value for the Custom plan.The rest of the panel:Then two collapsed disclosures — Backups, badged
OFF or ON, and Advanced. Both are covered below.The sticky bar at the top of the page reads NEW ADDON with CANCEL and CREATE ADDON. Choosing CREATE ADDON returns you to Addons with the toast “Addon created — Provisioning has started; status will update as it’s ready.” The list polls every five seconds while anything is still settling.The database you get
The form has no field for declaring databases. You get exactly one, namedapp: the hub appends it whenever the request does not name it, so a database called app always exists.That is enough for most resources — one addon, one application, one database. To get more than one you have to go outside the form, either through the API or through the Advanced JSON area:vector is the only supported extension — anything else is rejected with Unsupported PostgreSQL extension '<name>' for database '<db>'. And every database in one instance shares a single owner and a single credential, which is a security boundary you should read about in One owner, one secret before you split an instance across applications.Watching it come up
The list row shows a status pill, the major version, the storage size, andbackups on / backups off. The states an instance moves through are Pending, Creating, Initializing, Ready, Updating, Backing Up, Restoring, Error, Deleting, Hibernated and Fenced. On the detail page, a state that is not Ready carries a tooltip with the reason.Ready is a gate, not a decoration. A resource cannot read credentials until the instance has been ready at least once — before that the deploy stops with credentials not available until addon has been ready at least once, and a database that the operator has not applied yet gives database '<name>' not applied yet, awaiting operator reconciliation.Connect it to a resource
Two things happen when you wire an addon into a stack: the addon appears on the canvas, and one or more environment variables are bound to its credentials. The binding is what matters — the node is just the picture.Open the stack, go to the Architecture tab, and choose + Add resource. The last section of the panel is MANAGED ADD-ONS.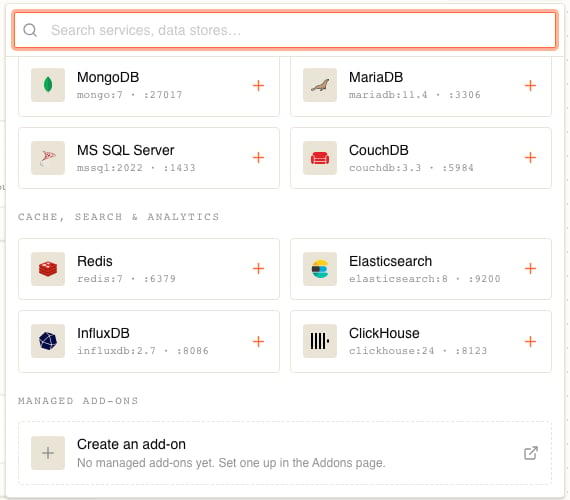
managed postgres, with a tick if this stack already uses it. When the organization has none, the section offers Create an add-on — “No managed add-ons yet. Set one up in the Addons page.” — which opens Addons in a new tab.Then bind the variables. Click the resource’s node to open the drawer, go to its Environment tab, and:1
Add a variable and switch its source
Add variable appends a plain row. Its From select offers Plain text, Secret, Addon, Resource and Self — choose Addon.
2
Pick the addon
The row moves into an Addon group: a bordered block whose header carries an addon picker (
Pick addon). If no addon is provisioned it reads “No addons linked. Add one from the bottom panel.”3
Confirm the database
The group header shows the database next to the addon. With a single database — the normal case — it is chosen for you and shown as plain text,
db: app. With more than one you get a Pick database select, and a database already used by another group in this resource is greyed out as in use.4
Choose the field and name the variable
Each row inside the group has a KEY on the left and a Select field picker on the right, listing the eight credential fields. Name the variable whatever your application expects —
DATABASE_URL, PGPASSWORD, anything. Add binding adds another row against the same addon and database, so one group can fill in a whole set of variables.5
Apply and deploy
Editing the drawer builds a draft. Nothing reaches the running container until the draft is applied and the stack is deployed. See Environment variables.
The superuser is not reachable from the UI. The Generate superuser credentials switch decides whether a privileged secret exists, but the env-var row has no control for choosing it — every binding the dashboard creates uses the database’s own limited owner. Requesting the superuser is an API-only capability (
config.superuser, or config.credential_scope: "superuser" on the connection), and it is refused unless the switch was on: connection '<label>' requests superuser access but addon '<id>' does not have superuser access enabled.⚙ <missing addon> · <db> · <field>, and warn “Addon was deleted. This variable won’t resolve. Remove to clean up.”Credential fields
These eight are everything a resource can read from an addon. Four of them are the same for every database in the instance and are taggedcluster in the picker.Bind
url when your framework wants one string, and the separate fields when it wants them separately. There is no reason to bind both.Backups
Everything the dashboard offers lives in the create form’s Backups disclosure and the detail page’s Backups section.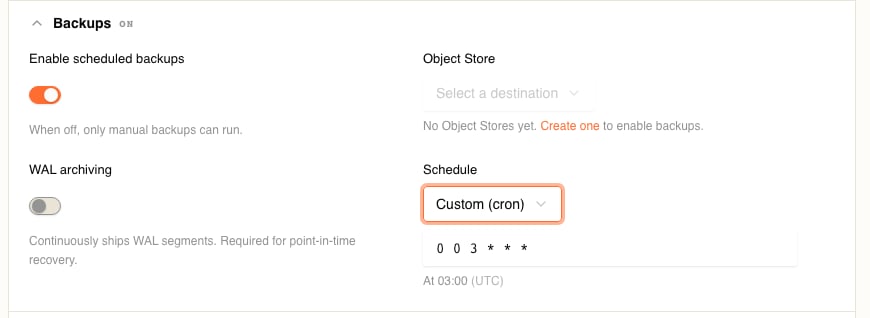
Two details that catch people out. The cron expression has six fields, not five — seconds first — so the default
0 0 3 * * * means 03:00, not three minutes past midnight; a five-field expression is rejected with “Use 6 space-separated fields: sec min hour day-of-month month day-of-week (or @daily).” And every schedule is UTC, which the form labels but is easy to skim past.On the detail page, once a destination is set, Run backup now triggers one immediately and the table below lists what has run: Name, Type (Scheduled or Manual), Phase (pending, running, completed, failed — a failure carries its error in a tooltip), Started, Completed and Size. It pages when there is more than one page of history.Retention is not exposed. There is no field in the form or the API for how long backups are kept or how many to keep, and nothing in the dashboard deletes one. Whatever your object store’s own lifecycle rules do is what happens.
High availability and placement
High availability is the one switch: off runs a single instance, on runs two. That is the whole of it in the UI — there is no field for three or more instances, no synchronous-replication setting, and no read-replica endpoint to bind a resource to.Placement is not in the form. Pinning instances to particular nodes or spreading them across failure domains — topology key, policy, node selectors, tolerations — is an API capability with no control anywhere in the dashboard. The Advanced disclosure is the one place you can reach it without leaving the UI: it takes raw JSON that is merged into the request.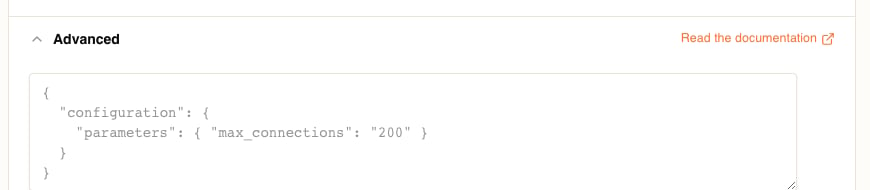
storage.storage_class, which the form never surfaces and always defers to you on, and databases, which the form never sends. Invalid JSON is rejected in place with Invalid JSON: <reason>. On an existing addon the disclosure is badged Modified as soon as you touch it, clearing it warns “These advanced fields will be removed on save.”, and saving asks you to confirm.Two more lifecycle capabilities — hibernating an instance and fencing it — exist as API endpoints with no UI at all.Restore into a new instance
Restoring always produces a new addon; there is no in-place restore. Set Create to Restore from backup on the create form and the panel grows:So WAL archiving is the difference between picking a moment and picking a backup. Turn it on before you need it — you cannot recover to a point in time that was never archived.Restore settings are frozen at creation:
Initialization configuration cannot be changed after creation, and the edit form does not show them. Importing from an external Postgres you run yourself is an API-only capability with no field in the form.One owner, one secret
Read that together with the credentials endpoint and you have the whole blast radius of one leaked token: read permission on an instance yields the owner password, the owner is the same for every database in the instance, and?superuser=true yields the superuser password wherever that switch is on. So a token that can read your addons can reach every database in every instance it can see. Scope tokens accordingly, and rotate one you have exposed.Edit an instance
The detail page’s Edit reopens the same form. What you can change: the plan and custom resources, High availability, Generate superuser credentials, everything under Backups, and the Advanced JSON. What is fixed for the life of the instance: the Name, the Version, the Storage size, the storage class, and the restore settings. Each is refused with its own message rather than silently ignored.Delete an instance
Open the instance from Addons and choose Delete. The confirmation is blunt, and accurate: Delete addon? — “The underlying database and storage for “<name>” are removed. This cannot be undone.”A referenced instance cannot be deleted. The API refuses withaddon '<id>' is in use by <references> and cannot be deleted, and the dashboard adds “Remove the stack references first, then try again.” Unbind the variables in every stack that reads it, deploy those stacks, then delete. Once accepted, the instance moves to Deleting and is torn down in the background — “<name> is being torn down.”
Related tasks
Environment variables and secrets
Map addon outputs and secret keys into an application.
Volumes and object stores
Configure persistent application data and Postgres backup destinations.