Outcome
Keep application data across restarts and redeployments by declaring a persistent volume at the exact data directory the service uses. The deployed release is healthy, and Stackdome reports the expected volume name, size, access mode, and provisioning phase. Object stores solve a different outcome: they hold PostgreSQL addon backups. Registering an object store is currently dashboard/API-only; there is no publicstackdome object-store command and object stores are not Stackfile mounts.
Prerequisites
- A repository with a
stackfile.yamland evidence of the directory the application writes to. - The URL of Stackdome Cloud or a self-hosted installation, plus an API token. See authentication and API tokens.
- A size chosen from the application’s current data and expected growth. Volume size and access mode cannot be changed after creation in the current platform workflow.
- For an object store, an existing Generic secret containing provider credentials and access to the Stackdome dashboard or API.
Agent prompt
Agent actions
1
Find the persistent data directory
Inspect image documentation, Dockerfile declarations, Compose volumes, application configuration, and existing deployment files. Distinguish durable application data from caches and temporary files.
2
Declare the volume and mount
Add a named entry under top-level
volumes, then mount that name under the resource’s volumes array at an absolute container path. Choose the size and access mode before deployment.3
Validate and deploy
Run
stackdome validate, confirm the active scope with stackdome whoami -o json, run stackdome deploy --wait -o json, and retain its non-empty release.id as the deployed release ID.4
Verify persistence resources
Poll
stackdome volume list --stack <stack-name> -o json for at most five minutes. Select the volume by name and require status.phase to equal Ready; Pending is not success. Then run stackdome status -o json and require the converged release ID to equal the deployed release ID, its state to be Released, and its health to be ok.5
Test the application behavior
Use an application-specific, reversible write/read check when available. Restart only the affected resource with
stackdome restart <resource> if the command is appropriate for the service, then confirm the data remains.Success criteria
stackdome validateexits successfully with the top-level volume and resource mount present.stackdome deploy --wait -o jsonexits successfully, returns a non-emptyrelease.idthat is retained as the deployed release ID, and returnsrelease.stateasReleased.stackdome status -o jsonreturnsconverged_release.idequal to the deployed release ID,converged_release.stateasReleased, andconverged_release.healthasok.stackdome volume list --stack <stack-name> -o jsoncontains the expectedname,spec.size, andspec.access_mode, and that selected volume hasstatus.phaseequal toReady.- An application-specific read after restart returns the data written before restart, when a safe persistence check is available.
CLI and Stackfile workflow
Declare storage and its mount together in the Stackfile:path must be an absolute path inside the container. size is required, and access_mode defaults to ReadWriteOnce when omitted; set it explicitly for reviewable agent changes. The name in the resource mount must match a top-level volume name.
- Make at most 30 attempts over five minutes, waiting ten seconds only after a confirmed
Pendingresult. - On each attempt, run
stackdome volume list --stack <stack-name> -o json. - If the command exits nonzero, stop immediately. Preserve its
stderras the diagnostic; do not classify an authentication, authorization, server, or network error as storage provisioning. - Parse
stdoutas a JSON array. If it is not valid JSON or is not an array, stop immediately and report an invalid structured-response error. - Select the single element whose
nameexactly equals the declared volume name. If it is missing, stop immediately and report the stack name and missing volume; do not keep polling the wrong target. - Require that selected object’s declared
spec.sizeandspec.access_mode. If either differs, stop immediately and report the mismatch. - Read that selected object’s
status.phase:Readypasses the volume gate.Pendingpermits the next attempt after ten seconds, unless this was attempt 30.- A missing or any other phase is an immediate diagnostic error; do not treat it as still provisioning.
Pending, the wait has timed out. Do not report success and do not delete the volume. Run only the verified volume and stack-status diagnostics:
status.conditions for its reason and message, and inspect stack conditions for a workload waiting on storage. On self-hosted Stackdome, correct the default storage class or available capacity; on Stackdome Cloud, route the unresolved provisioning condition to support. If the user chooses to back out a new mount while storage is repaired, remove only that mount from the Stackfile, validate, and redeploy. Delete and recreate a newly created empty volume only after explicit approval and after the provisioning cause is corrected.
The CLI also exposes stackdome volume create, list, and delete. volume create provisions a volume but does not declare the application mount; for a reproducible application change, keep the definition and mount in stackfile.yaml and deploy them together.
Object-store registration and editing remain dashboard/API-only. Once an object store is configured on a PostgreSQL addon, the CLI can trigger and list addon backups as described in Postgres.
Dashboard workflow
Two kinds of storage share this page, and they have almost nothing to do with each other.A volume is a disk. It belongs to a stack, and one or more resources in that stack mount it at a mount path inside the container. What you write there survives a restart and a redeploy.An object store is a bucket somewhere else — S3, Azure, GCS. Nothing mounts one. Its only job today is to be the destination for Postgres addon backups.Dashboard prerequisites
- A stack with at least one resource. A volume is created already attached to a resource, so the Volume tile stays disabled until the stack has one.
-
On self-hosted Stackdome, a cluster whose default storage class can provision disks. Stackdome never asks you which storage class to use for a volume — there is no field in the dialog, and the API sends none — so your cluster’s default
StorageClassis what provisions it. Check what that is before you start: - A Secret holding the bucket credentials, if you are registering an object store. The form only ever references a Secret; you never type a key into it. See Create the secret.
A volume belongs to the stack, not to a resource
This is the part that surprises people. A volume is a stack-level object with its own name, size and lifecycle. Resources reference it by name. That is why a stack card counts the two separately —3 resources · 2 volumes — and why deleting a resource does not delete the disk it was using.Its spec is also fixed the moment it is created. Name, size, access mode and storage class are all write-once: there is no update endpoint for a volume, only create, read and delete. Plan the size before you create it.Declare a volume
1
Open the Architecture tab
Open the stack and stay on the canvas.
2
Choose + Add resource → Volume
The panel lists it under the Storage heading as Volume — “persistent storage”. If the tile is greyed out, the stack has no resource yet.
3
Fill in the dialog
Four fields, described below.
4
Deploy
The volume itself is provisioned as soon as the editor saves. The mount only reaches the cluster on your next deploy.
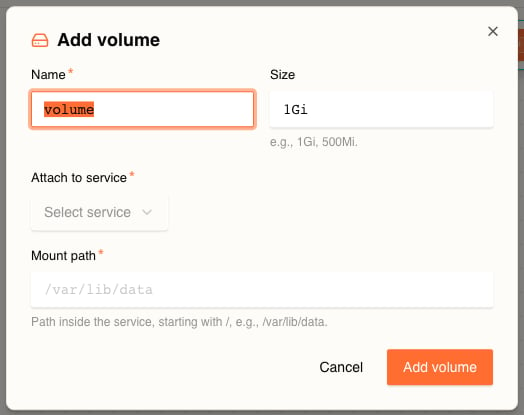
There is no storage-class field, no access-mode field, and no source field. Every volume the dashboard creates is an empty disk.
Creating the volume and mounting it are one gesture, but two things. The dialog writes a stack-level volume and a mount on the resource you picked. The volume is created on the server as soon as the editor autosaves, and provisioning starts immediately — you do not have to deploy for the disk to exist. The mount, like every other spec change, only reaches the cluster when you deploy. The pill above the canvas counts what has not been released yet — Apply 1 change, next to Deploy.
Where a volume shows up
A volume that some resource mounts appears as a chip along the bottom of that resource’s node, showing the volume’s name; hover it for the mount path. A volume nothing mounts appears instead as its own node, badged VOLUME, floating on the canvas.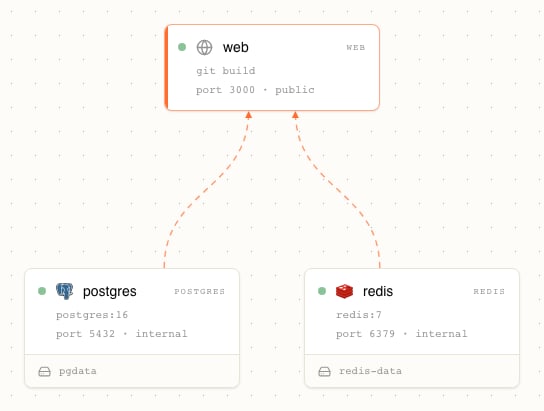
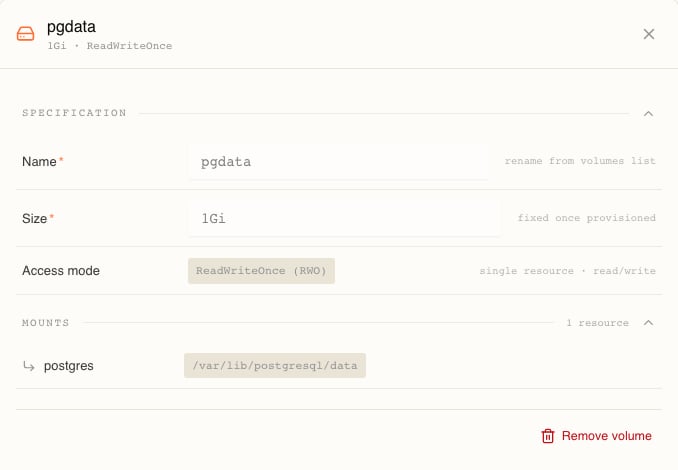
Mounts, seen from the resource
Open a resource’s drawer and its Configuration tab has a Mounts section, annotated “managed on canvas”. It is deliberately read-only there: it shows the volume, the path, and a shortcut arrow to the volume’s own settings.
Access modes
Every volume Stackdome creates isReadWriteOnce. The drawer shows it as ReadWriteOnce (RWO) and offers no alternative; the dialog has no access-mode field. The REST contract’s Volume schema does define three values — ReadWriteOnce, ReadWriteMany and ReadOnlyMany — but the dashboard only ever sends the first, and the field cannot be changed after creation.What that means in practice: one node can mount the volume, and only that node. Two resources both scheduled onto that node can share it. A resource whose replicas land on different nodes cannot — the replicas that land elsewhere will not start, because the disk is not available to them.Changing a volume on a running stack
Object stores
An object store is a registered backup destination. Nothing in a stack mounts it, and it is not a substitute for a volume — the only thing that reads one today is the Postgres addon, for scheduled backups, WAL archiving, and restoring a new instance from an existing instance’s backups.Find them under PLATFORM → Object Stores in the sidebar, at/object-stores. The page is headed Object Stores — “Backup destinations for Postgres add-ons. Supports AWS S3, S3-compatible (e.g. MinIO), Azure, and GCS.” — and reads NO OBJECT STORES YET until you register one. Registered stores are listed under Organization Object Stores: they belong to the organization, not to a stack.Choose New Object Store.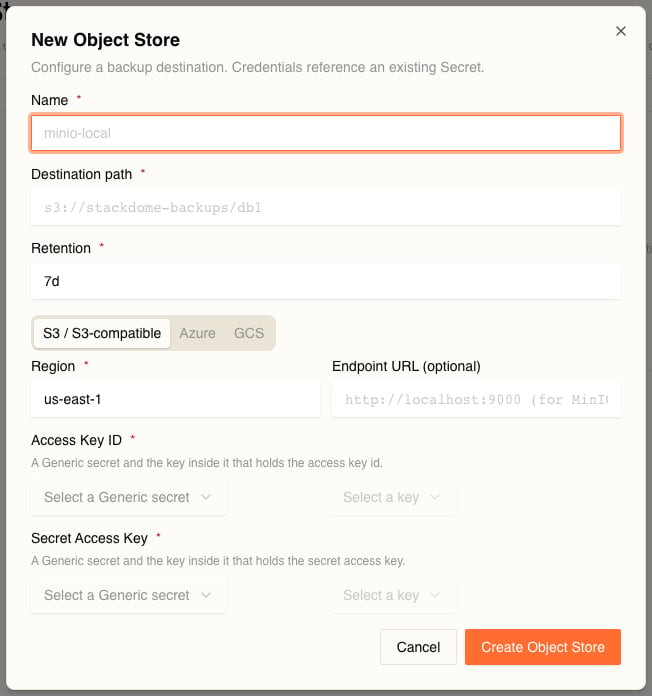
Credentials are never typed into this form. Every credential field picks a Generic Secret and a key inside it, which is what the dialog means by “Credentials reference an existing Secret.” Create the Secret first — see Create the secret — then come back. If the select is empty, you have no Generic Secret yet.
Using one
Turn on backups on the Postgres addon and pick the store there — the addon’s Backups section has the Object Store select, and it refuses to enable scheduled backups or WAL archiving without one. Restoring a new instance from a store’s backups goes through the same list.Deleting a store that an addon still points at is refused. The toast shows the reason the API gives; when the API returns no message, the dashboard falls back to “This Object Store is in use by one or more Postgres add-ons.” Either way, detach it from the addon first.Postgres
Enabling scheduled backups, WAL archiving, and restoring an instance from an object store.