Outcome
Deploy the public Stackdome demo repository as a three-resource stack. Stackdome builds its web application and worker from separate repository contexts, runs Redis from a published image, provisions persistent Redis storage, and waits until the release is healthy. The web resource produces a public URL you can return to the user.Prerequisites
- A local clone of
https://github.com/Stackdome/stackdome-demo.git. The example application is underhello-stack. - The URL of Stackdome Cloud or a self-hosted installation, plus an API token. See authentication and API tokens.
- Stackdome Cloud supplies the registry used for git builds. On self-hosted Stackdome, git builds require connected compute with an image registry.
- For a private repository, a git provider already connected to the organization. The current public CLI cannot create or manage git-provider credentials; use the dashboard flow below or the API before deploying.
- For the GitHub App flow on a self-hosted installation, an externally reachable
SERVER_EXTERNAL_URLand a GitHub account allowed to install the app for the repository owner.
Agent prompt
Agent actions
1
Inspect the repository
Use
hello-stack/docker-compose.yml as the topology reference, then cross-check hello-stack/README.md and both Dockerfiles. Create one Stackfile resource for each service and carry over only behavior supported by the Stackfile schema. The repository declares web on port 3000, a stateless worker, Redis on port 6379, and persistent Redis data under /data.2
Initialize the Stackfile
Run
stackdome init --name hello-stack from the repository’s hello-stack directory. Its experimental converter creates a draft from docker-compose.yml and warns that the two local builds need a git repository. Treat the Compose file—not the generated draft—as the source of architectural hints.3
Set the git build source
Set both build resources to
https://github.com/Stackdome/stackdome-demo.git on main. Use hello-stack/web for the web context and hello-stack/worker for the worker context because build paths are resolved from the cloned repository root.4
Validate and authenticate
Run
stackdome validate, then authenticate with stackdome login --url https://<your-stackdome-host> --token <api-token> and confirm the active scope with stackdome whoami -o json.5
Deploy and verify
Run
stackdome deploy --wait -o json, retain its non-empty release.id as the deployed release ID, then run stackdome status -o json. For a public service, run stackdome open -o json and return an entry from urls.Success criteria
stackdome validateexits successfully for the generatedstackfile.yaml.stackdome deploy --wait -o jsonexits successfully, returns a non-emptyrelease.idthat is retained as the deployed release ID, and returnsrelease.stateasReleased.stackdome status -o jsonreturnsconverged_release.idequal to the deployed release ID,converged_release.stateasReleased, andconverged_release.healthasok.- A public service returns at least one entry in the
urlsarray fromstackdome open -o json. - The Stackfile records both demo build contexts, web port
3000, Redis port6379, Redis dependencies, and the persistent/datamount found in the repository.
CLI workflow
Clone the demo and run the initializer beside its Compose file:{{ redis.host }} creates the resource connection and supplies the destination hostname to both Node.js processes. Omit branch and tag to let the server resolve the repository’s default branch. To pin a commit, set commit together with the branch or tag from which Stackdome can fetch it. See the Stackfile guide for the Compose conversion details and the Stackfile reference for every field.
Validate before authentication or deployment:
stackfile.yaml.
Dashboard workflow
Use the dashboard when you need to connect a provider or prefer the visual stack editor. For a complete first-deploy walkthrough, see Deploy using the dashboard.Connect a provider
The sidebar lists this under INTEGRATIONS → Git Providers. The page itself is headed Git providers, and the panel of what you have already connected is CONNECTED PROVIDERS.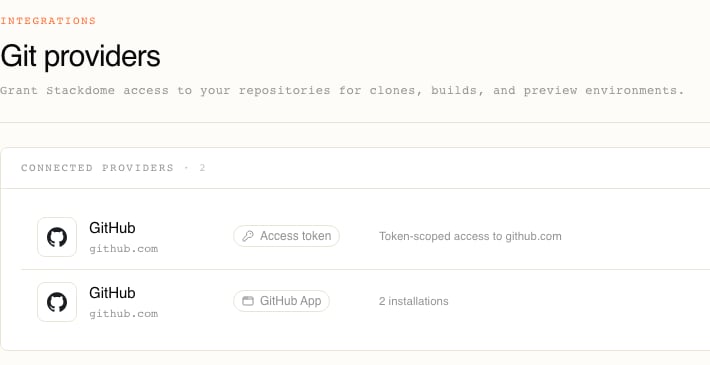
N installations with all repositories or selected repositories, or Token-scoped access to <host>), and whether it works.Choose Connect provider to start. The dialog runs a three-step stepper — PROVIDER, CONNECT, DONE.
1
Pick where your code lives
The first step asks “Where does your code live?” and offers five tiles: GitHub (“App install or access token”), GitLab, Bitbucket, Gitea, and Other — the last four all “Access token”.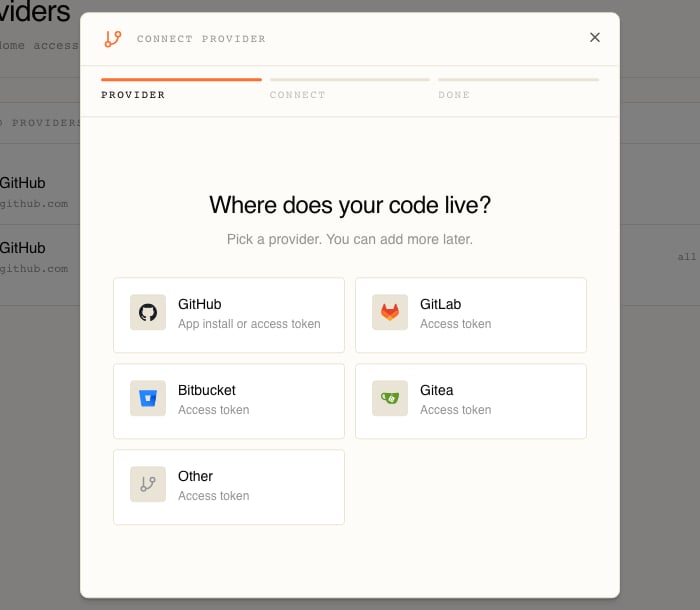
2
Choose how to authenticate
Only GitHub gets a choice here. Choosing GitHub opens Connect GitHub with two options: Install GitHub App (marked RECOMMENDED) and Use an access token. Every other provider goes straight to the token form.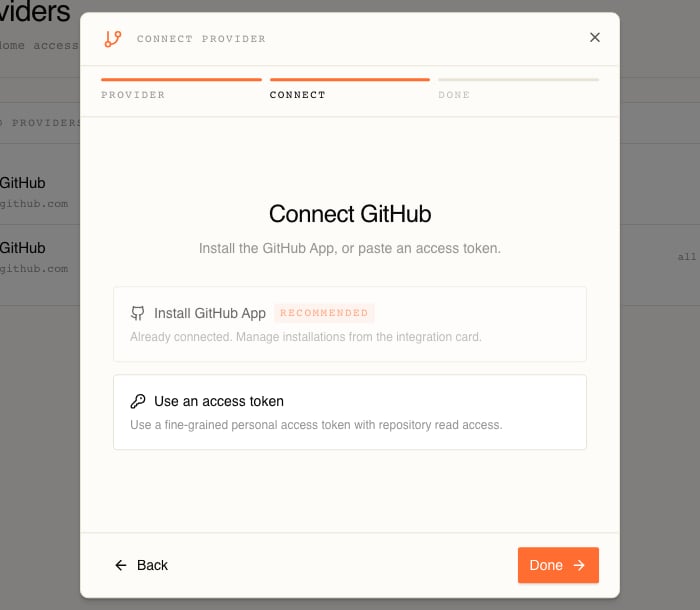
3
Finish and close
The last step confirms GitHub App installed or “<Provider> connected”. Choose Done.
The GitHub App path
Prefer this one. It gives per-repository access you manage on GitHub, it delivers webhooks, and there is no token to rotate.Choosing Install GitHub App opens a popup and posts an app manifest to GitHub’s app-creation page. You are not filling that page in — Stackdome has already described the app it wants, and GitHub is showing it to you for approval. This is what it asks for:Contents and Metadata read are what cloning needs. Pull requests write is what lets Stackdome comment on a pull request about its preview environment — it never writes to your code.When you confirm creation, GitHub redirects back to the callback and Stackdome exchanges a one-time code for the app’s credentials — its app ID, private key, webhook secret and client credentials — and stores them encrypted. The one-time state that ties the redirect to your session is valid for 15 minutes; take longer and you start over.While it waits, the wizard shows a checklist — “Opening GitHub authorization…”, “Authorizing the installation…”, “Fetching accessible repositories…” — with a Check again button. It polls every five seconds for up to about three and a half minutes, then gives up with “Timed out waiting for the GitHub App installation.” Check again re-lists installations directly from GitHub, which is the escape hatch when a webhook delivery went missing. If the popup never opened you get “Popup blocked — allow popups for this site and try again.”, and any other failure shows Couldn’t connect to GitHub with a Retry.
One GitHub App per organization. A second attempt is rejected with
409 a GitHub App is already installed for this organisation, and the wizard greys the option out with “Already connected. Manage installations from the integration card.” To reach more repositories, add another installation of the existing app from the row’s Manage on GitHub rather than creating a second app.The access-token path
Use this for GitLab, Bitbucket, Gitea, anything self-hosted, or GitHub when you would rather not install an app. The form is the same for every provider, and the dialog is explicit about what happens to what you paste: “Stackdome stores the credentials encrypted and uses them only for clones.”What kind of token each provider wants:
Choose Connect. If the credentials are refused you stay on the form with Couldn’t verify the token and the reason underneath.
Verify and maintain a provider
Each row’s ⋯ menu holds the actions available for that kind of provider.Verify repository access is the cheapest way to find out whether a token actually works, before a build depends on it. It opens a dialog — “Confirms the <host> integration can access a repository.” — with one field, Repository URL. For this guide, use
https://github.com/Stackdome/stackdome-demo. Stackdome then tries a real access check against that repository.- Success is a Repository access verified toast.
- Failure is a Couldn’t verify repository access toast carrying the reason, most often
verification failed for '<url>': <what the provider said>. - A URL on the wrong host is rejected before anything is attempted:
repository host 'gitlab.com' does not match integration host 'github.com'. - Anything that is not an
http(s)URL is caught in the form: “Enter a valid http(s) URL (e.g. https://github.com/acme/webapp).”
only git_credentials integrations can be verified directly. That is deliberate rather than missing: an app’s access runs through short-lived per-installation tokens instead of stored credentials, so there is nothing static to test. Its equivalent check is the repository picker in the next section — if your repository appears in that list, the app can reach it.Point a resource at a repository
Open the stack, go to the Architecture tab, and click the resource’s node on the canvas to open the drawer. Everything below lives in the drawer’s SOURCE section.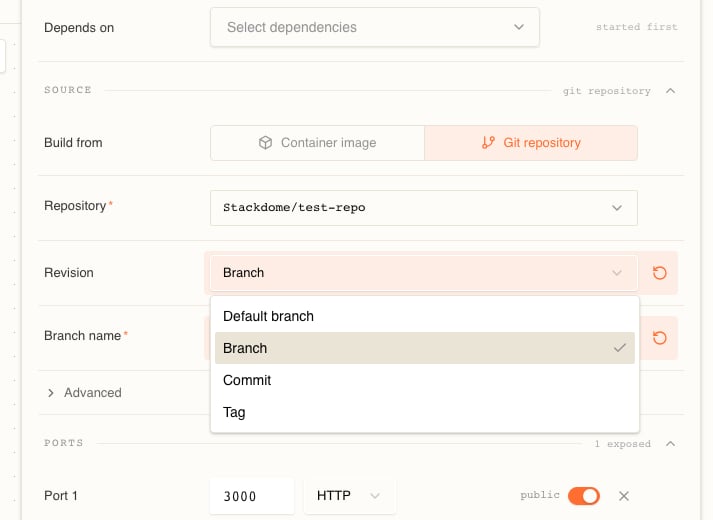
1
Set Build from to Git repository
Build from is a two-way toggle: Container image or Git repository. A source can only be one of them, so switching hides the other’s fields — but the values you had are kept, and switching back restores them.
2
Choose the repository
Repository is required. It is a combobox, not a plain text box: it reads “Select repository or enter URL” until something is chosen, and opening it gives you a searchable list of repositories fetched from your connected providers (“Search repositories or paste a URL…”). When more than one usable provider is connected, an Integration select appears so you can say which one to list from.Picking from the list is the better move. It records which provider the repository came from, so the build gets the right credentials without guessing. If the list comes up empty (“No repositories found.”) you can still fall back to a literal URL with the Use ”…” as repository URL item — but a URL entered by hand carries no provider with it.
3
Choose the revision
Revision is a select with exactly four choices: Default branch, Branch, Commit, and Tag. Choosing anything other than Default branch adds a second required field beneath it — Branch name, Commit hash, or Tag name. Leave that blank and validation stops you: “Enter a value for the selected revision, or clear the revision type.”
4
Apply the change
Editing the drawer builds a draft — the drawer header counts your pending edits and the footer reads Apply 1 change. Nothing is built until the draft is applied and the stack is deployed.
The trade-off is only about drift. Branch and Default branch let a redeploy pick up code you did not intend to ship; Commit cannot, but you have to change the value to ship anything new.
Build options
The drawer’s Advanced disclosure — labelled “build & push” — holds the three fields most repositories never need to touch.The build
When you deploy, Stackdome sends the build request to the deployment destination. Its build service clones the repository, builds the image, and pushes it. The resource’s node on the canvas is badgedgit build while this is how it gets its image.By default, Stackdome uses the deployment destination’s build registry, under a path derived from the organization, stack, and resource. Stackdome Cloud supplies this registry. On self-hosted Stackdome, connected compute must have Enable Image Registry selected; otherwise it can run only resources that reference an image hosted elsewhere. See Connect compute.You can watch it on the stack’s Deployments tab. Each release in the deploy timeline shows Build, Deploy and Ready as separate phases, and records the revision it actually resolved — a release built from a branch names the commit it landed on, so you always know what is running even when the source said main.Pushing to git does not deploy
There is no auto-deploy on push, and no setting to turn one on. Deploying a stack is something you ask for: the timeline labels a release you started Manual deploy, and a rollback Rollback to #2. The one release Stackdome starts without being asked is a preview environment’s — see the end of this section.The GitHub App does subscribe topush — the manifest asks for it — so deliveries do arrive at /api/v1/webhooks/github. The handler then drops them. Only two event kinds are acted on:So a commit to the branch a resource tracks changes nothing on its own. The next deploy you trigger will pick it up, because a branch is resolved at deploy time — but the deploy is yours to start.One case does rebuild by itself. Pushing to the branch of an open pull request reaches Stackdome as a
pull_request synchronize event, not as a push, so it is handled: the pull request’s preview is rebuilt at the new head commit. Two conditions gate that, and failing either drops the delivery silently — the repository must have preview environments enabled, and the pull request’s base branch must be the one that preview configuration targets. A pull request opened against any other base branch is ignored no matter how often you push to it. Your stack is untouched either way — an ordinary branch push, on a branch with no open pull request, still does nothing.Every webhook delivery is HMAC-verified against that provider’s webhook secret before anything happens, and a bad signature is refused.
Troubleshooting
Start with structured CLI output. Use the release ID returned bystackdome deploy -o json and the build ID returned by stackdome build list:
dockerfile is relative to context. On self-hosted Stackdome, also confirm that connected compute has an image registry. A failed stackdome deploy --wait -o json is not a successful deployment even if the stack document was applied.
Build progress and failures are release events. Open the stack’s Deployments tab and read the activity stream for the release. The wording is predictable:The detail on a failure carries the reason and message from the builder, plus its exit code and how many times it restarted. The build itself runs on the cluster, so its complete output lives there; the dashboard surfaces the failure reason rather than the whole log.Common causes, in the order worth checking:
- The repository was entered as a URL instead of picked. A hand-typed URL carries no provider, so the build has no credentials for a private repository. Reopen the drawer and select it from the list.
- The provider lost access. Check the row on Git Providers. Needs attention means no stored credentials. Needs setup means an app that was never installed. For a GitHub App, an installation that was removed or suspended on GitHub shows up as a token-minting failure on the build rather than on the row — Check again or Manage on GitHub will tell you which installations are actually live.
- The revision does not exist. A Branch name, Tag name or Commit hash that was renamed, deleted or force-pushed away fails at clone time.
- No
Dockerfilewhere the build looked. Dockerfile path is relative to Build context, not to the repository root. In a monorepo, get the context right first. - Self-hosted compute has no registry. The build has nowhere to push. See Connect compute.
Related tasks
Deploy with a coding agent
Follow the complete agent operating contract, verification rules, and failure routes.
Stackfile reference
Configure build revisions, contexts, ports, environment values, dependencies, and storage.
Deploy from an image
Run an image that was already built and published elsewhere.
Preview environments
Build isolated releases for supported pull-request events.