> ## Documentation Index
> Fetch the complete documentation index at: https://docs.stackdome.com/llms.txt
> Use this file to discover all available pages before exploring further.
> ## Agent Instructions
> Treat Stackdome as an application-delivery platform for coding agents and developers, not as a Kubernetes dashboard.
> Prefer the Stackdome agent plugin as the user entry point and the stackdome CLI as the execution interface.
> Route agents who need the maintained deploy skill to npx skills add stackdome/skills and the complete operational workflow to /guides/ai-agents.
> Verify commands and flags with stackdome --help. Run stackdome init before authoring stackfile.yaml and stackdome validate before deploying.
> Use -o json for automation and verify documented terminal states before claiming success.
> Never request a user's account password. Use API-token authentication.
> During alpha, Stackdome Cloud is ephemeral and capacity-limited, and each organization can connect one cluster.
> Do not expose Kubernetes as a user concern unless the task is self-hosting or infrastructure architecture.
# Deploy using the dashboard
> Use the visual Stackdome editor to take a git repository from zero to a live URL.
The recommended path is [Quickstart with a coding agent](/quickstart). To run the same validated workflow yourself, use [Quickstart with the CLI](/get-started/cli). Continue here for the full visual dashboard walkthrough.
You are going to create one stack with one resource, point it at a public git repository, and end up with an HTTPS URL you can open. Stackdome clones the repository, builds the image, runs it, and publishes a hostname for it. The walkthrough below is a real deploy: every label and every number on this page comes from running it, and it took **1 minute 24 seconds** from pressing **Deploy** to the release going live.
## Prerequisites
* **A Stackdome installation you can sign in to.** If you need to create one, [install Stackdome on your own infrastructure](/self-host/install). For the recommended agent-led path, use [Quickstart with a coding agent](/quickstart).
* **A repository with a Dockerfile.** Stackdome builds your image from a Dockerfile in the repository, so the repository needs one. This page uses a public sample:
```text theme={null}
https://github.com/dockersamples/linux_tweet_app.git
```
It is a few kilobytes, its Dockerfile sits at the repository root, and it serves a static page on port 80:
```dockerfile theme={null}
FROM nginx:latest
COPY index.html /usr/share/nginx/html
COPY linux.png /usr/share/nginx/html
EXPOSE 80 443
CMD ["nginx", "-g", "daemon off;"]
```
Use it verbatim to follow along, or substitute your own repository and adjust the port in step 4.
* **A connected git provider — only for private repositories.** A public repository needs no credentials: you paste its URL and Stackdome clones it anonymously. To build from a private repository, connect a provider under **Git providers** first, then pick the repository from the list instead of pasting a URL. See [Deploy from git](/guides/deploy-from-git).
You are never asked which compute target to deploy to. A stack runs on the connected compute configured for your organization, so the create flow has no target picker — there is nothing to choose.
From **Stacks**, press **New Stack**. Stackdome asks how you want to start:
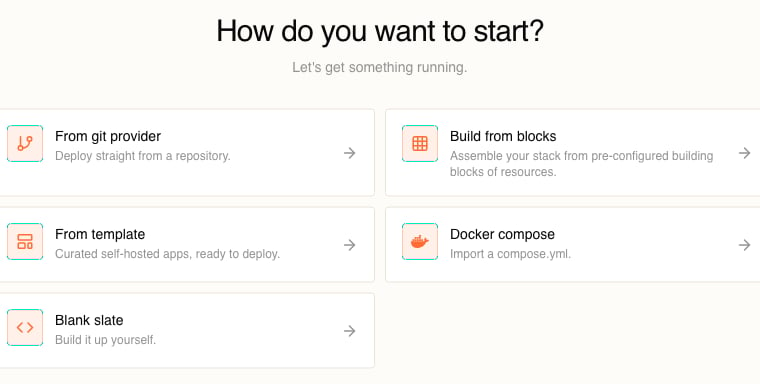 Every option lands you in the same editor; they differ only in how much they fill in for you. Choose **Blank slate** so you can see each piece as you add it — once you know the shape, **From git provider** gets you to the same place in fewer clicks.
You are now on an empty canvas on the **Architecture** tab, with the stack name as an editable field at the top. Type a name — lowercase, with hyphens if you want them:
```text theme={null}
docs-scratch
```
Every option lands you in the same editor; they differ only in how much they fill in for you. Choose **Blank slate** so you can see each piece as you add it — once you know the shape, **From git provider** gets you to the same place in fewer clicks.
You are now on an empty canvas on the **Architecture** tab, with the stack name as an editable field at the top. Type a name — lowercase, with hyphens if you want them:
```text theme={null}
docs-scratch
```
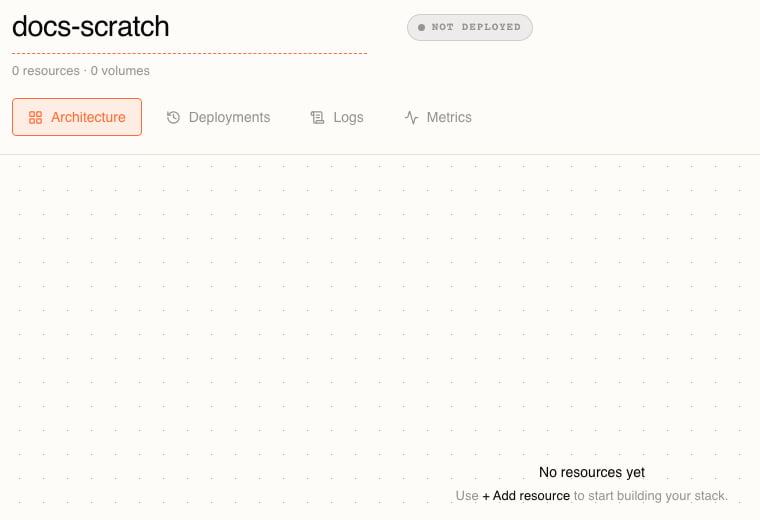 The badge reads `NOT DEPLOYED` and the summary reads `0 resources · 0 volumes`. Nothing exists on the server yet — everything you do until you press **Deploy** is a draft held in your browser.
Press **+ Add resource**. The menu groups everything Stackdome can drop on the canvas: **SERVICES**, **STORAGE**, **DATABASES**, **CACHE, SEARCH & ANALYTICS**, and **MANAGED ADD-ONS**.
The badge reads `NOT DEPLOYED` and the summary reads `0 resources · 0 volumes`. Nothing exists on the server yet — everything you do until you press **Deploy** is a draft held in your browser.
Press **+ Add resource**. The menu groups everything Stackdome can drop on the canvas: **SERVICES**, **STORAGE**, **DATABASES**, **CACHE, SEARCH & ANALYTICS**, and **MANAGED ADD-ONS**.
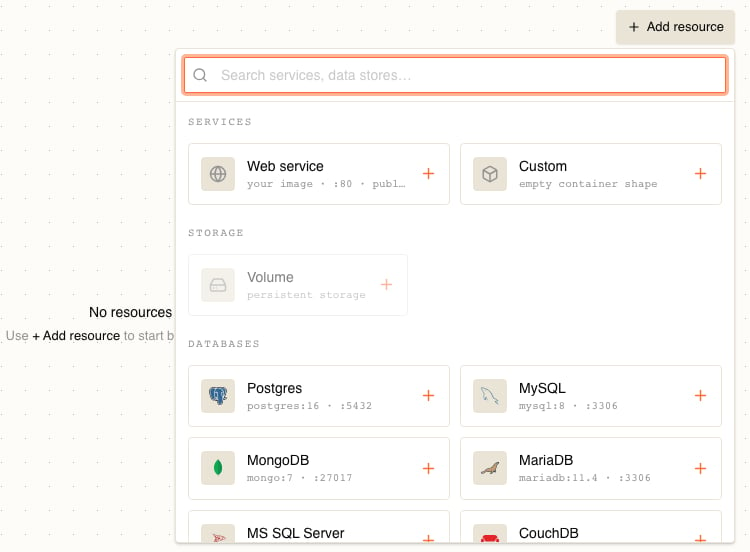 Choose **Web service**, described as `your image · :80 · public`. It is a template: it creates one resource named `web` with a single public port `80`, which is exactly the shape you want. The canvas now holds one node and the summary reads `1 resource · 0 volumes`.
Click the node to open its drawer on the right, on the **Configuration** tab. Under **Source**, **Build from** starts on **Container image** — press **Git repository** instead.
The **Repository** field reads *Select repository or enter URL*. Click it, paste your repository URL into the search box, and choose the entry that appears: `Use "https://github.com/dockersamples/linux_tweet_app.git" as repository URL`. Leave **Revision** on **Default branch**.
Choose **Web service**, described as `your image · :80 · public`. It is a template: it creates one resource named `web` with a single public port `80`, which is exactly the shape you want. The canvas now holds one node and the summary reads `1 resource · 0 volumes`.
Click the node to open its drawer on the right, on the **Configuration** tab. Under **Source**, **Build from** starts on **Container image** — press **Git repository** instead.
The **Repository** field reads *Select repository or enter URL*. Click it, paste your repository URL into the search box, and choose the entry that appears: `Use "https://github.com/dockersamples/linux_tweet_app.git" as repository URL`. Leave **Revision** on **Default branch**.
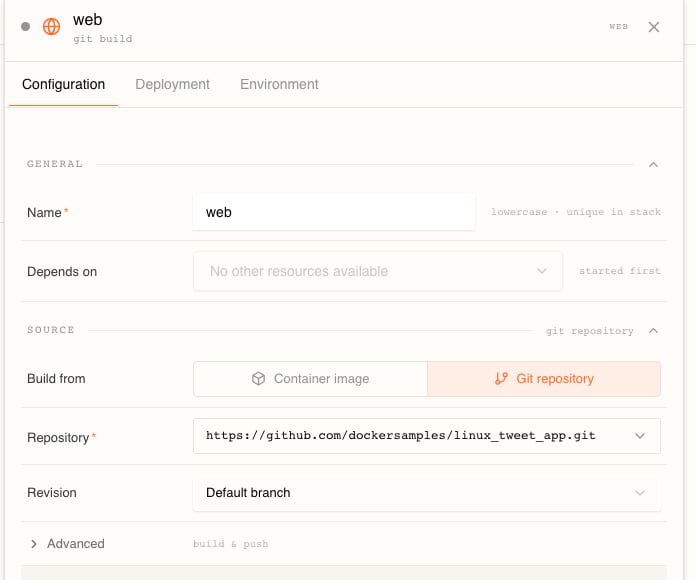 Two things confirm it took: the **Source** section is now summarised as `git repository`, and the node on the canvas reads `git build` where an image reference would otherwise sit — visible on the node in the next two steps.
That is the whole source configuration. The **Advanced** row underneath holds the `build & push` settings — the Dockerfile path, the build context, and where to push the finished image — and their defaults are `Dockerfile`, `.`, and the deployment destination's default build registry. You only open it if your Dockerfile is not at the repository root.
Scroll down to **Ports** in the same drawer. The **Web service** template already filled it in.
Two things confirm it took: the **Source** section is now summarised as `git repository`, and the node on the canvas reads `git build` where an image reference would otherwise sit — visible on the node in the next two steps.
That is the whole source configuration. The **Advanced** row underneath holds the `build & push` settings — the Dockerfile path, the build context, and where to push the finished image — and their defaults are `Dockerfile`, `.`, and the deployment destination's default build registry. You only open it if your Dockerfile is not at the repository root.
Scroll down to **Ports** in the same drawer. The **Web service** template already filled it in.
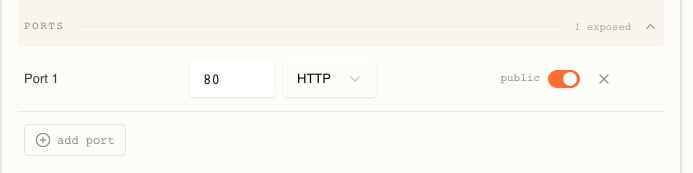 Read it left to right: port number `80`, protocol `HTTP`, and **public** switched on. The section summary reads `1 exposed`.
* **The number must be the port your app listens on inside the container.** The sample serves on `80`, so leave it. If your app listens on `3000`, type `3000`.
* **`public` is what earns you a URL.** Leave it off and the port is reachable only by other resources in the same stack — the summary then reads `1 internal` instead.
* **You never type a port name.** Stackdome derives one from the number.
The port is plain HTTP. Stackdome terminates TLS at the edge, so your resource does not need a certificate — see [Domains and TLS](/guides/domains-and-tls).
Press **Deploy** (or ⌘↵). On a draft, that one button does two things: it creates the stack — a single declarative apply that validates the whole document and creates the stack and its resources in one transaction, so a rejected deploy leaves nothing behind — and then it starts the first release.
Read it left to right: port number `80`, protocol `HTTP`, and **public** switched on. The section summary reads `1 exposed`.
* **The number must be the port your app listens on inside the container.** The sample serves on `80`, so leave it. If your app listens on `3000`, type `3000`.
* **`public` is what earns you a URL.** Leave it off and the port is reachable only by other resources in the same stack — the summary then reads `1 internal` instead.
* **You never type a port name.** Stackdome derives one from the number.
The port is plain HTTP. Stackdome terminates TLS at the edge, so your resource does not need a certificate — see [Domains and TLS](/guides/domains-and-tls).
Press **Deploy** (or ⌘↵). On a draft, that one button does two things: it creates the stack — a single declarative apply that validates the whole document and creates the stack and its resources in one transaction, so a rejected deploy leaves nothing behind — and then it starts the first release.
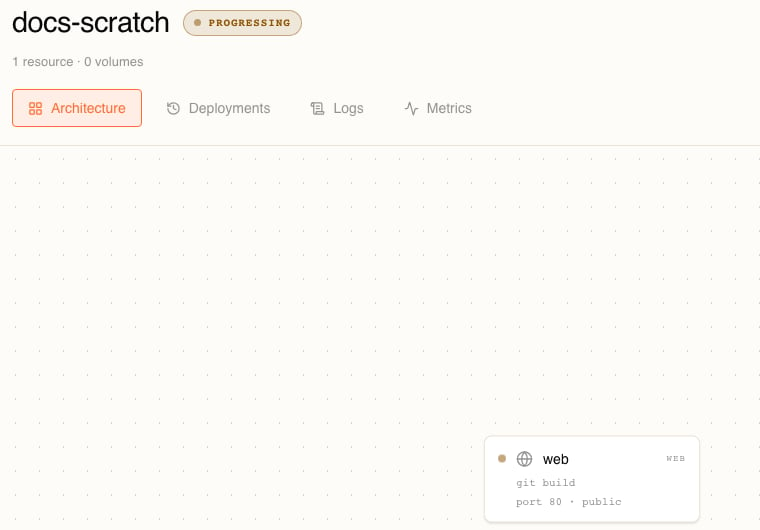 A **Deploy started** toast appears, the address changes from `/stacks/new` to `/stacks/{id}`, and the badge moves from `NOT DEPLOYED` to `PROGRESSING`. From here the stack exists whether or not the release succeeds, so you can close the tab and come back.
Open the **Deployments** tab. **Deploy timeline** shows release `#1`, `Manual deploy`, with three stages — **Build**, **Deploy**, **Ready** — that tick over as it goes, and an activity log of every event underneath.
A **Deploy started** toast appears, the address changes from `/stacks/new` to `/stacks/{id}`, and the badge moves from `NOT DEPLOYED` to `PROGRESSING`. From here the stack exists whether or not the release succeeds, so you can close the tab and come back.
Open the **Deployments** tab. **Deploy timeline** shows release `#1`, `Manual deploy`, with three stages — **Build**, **Deploy**, **Ready** — that tick over as it goes, and an activity log of every event underneath.
 When it finishes, the release is marked `LIVE` and stamped with the exact commit it built. A release always records that commit, which is what makes a rollback meaningful — see [Releases](/concepts/releases).
Underneath, a resources panel counts what is ready and the activity log accounts for every second of the deploy:
When it finishes, the release is marked `LIVE` and stamped with the exact commit it built. A release always records that commit, which is what makes a rollback meaningful — see [Releases](/concepts/releases).
Underneath, a resources panel counts what is ready and the activity log accounts for every second of the deploy:
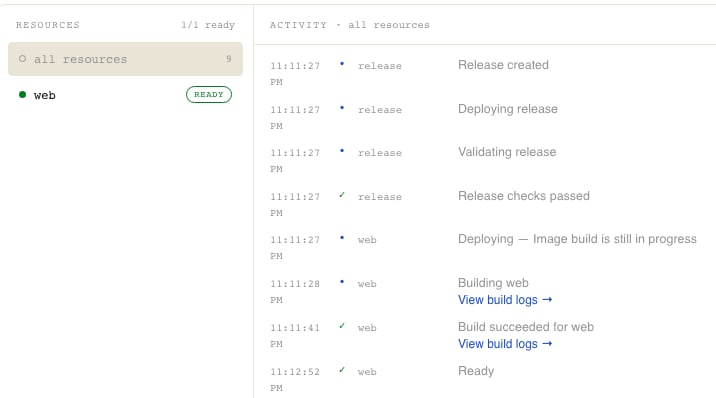 Read the timestamps and you can see where the time went: the image build took 13 seconds — it is a small Dockerfile — and the pods took another 71 to come up and report ready. One more line follows `Ready`, below the fold: `Release is live`. Your own numbers depend on how heavy your build is; a first build with no cache is the slow one.
Every `Building` and `Build succeeded` entry carries a **View build logs** link, which is where you look first if a build fails.
The stack header has grown a **PUBLIC** row listing the resource and the hostname Stackdome generated for it. The header sits above the tabs, so it is there whichever tab you are on.
Read the timestamps and you can see where the time went: the image build took 13 seconds — it is a small Dockerfile — and the pods took another 71 to come up and report ready. One more line follows `Ready`, below the fold: `Release is live`. Your own numbers depend on how heavy your build is; a first build with no cache is the slow one.
Every `Building` and `Build succeeded` entry carries a **View build logs** link, which is where you look first if a build fails.
The stack header has grown a **PUBLIC** row listing the resource and the hostname Stackdome generated for it. The header sits above the tabs, so it is there whichever tab you are on.
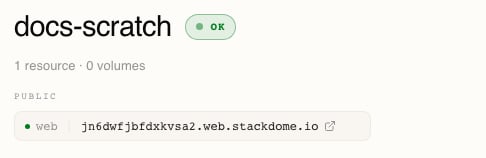 The hostname is built from three parts:
```text theme={null}
..
```
The token is a short, stable hash of the stack, the resource, and the port number, so the address does not change under you as long as those three stay the same. `` is the domain configured on your organization; if you would rather serve this on a name you own, that is [Domains and TLS](/guides/domains-and-tls).
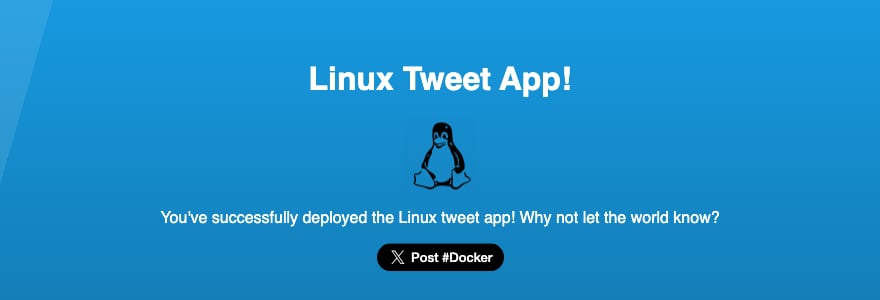
Click the hostname. Your app is live, over HTTPS:
The hostname is built from three parts:
```text theme={null}
..
```
The token is a short, stable hash of the stack, the resource, and the port number, so the address does not change under you as long as those three stay the same. `` is the domain configured on your organization; if you would rather serve this on a name you own, that is [Domains and TLS](/guides/domains-and-tls).
Click the hostname. Your app is live, over HTTPS:
 ## What you have now
One stack, holding one resource, built from a commit in your repository and published at a hostname. Everything else in Stackdome is added to that shape: another resource beside this one, a volume for the data it keeps, environment variables to configure it, an addon for a database you would rather not run yourself. Editing a live stack works the same way as building this one did — change something on the canvas, and the pending edits collect as a draft until you press **Deploy** again.
Done experimenting? Open the stack, press the **Stack actions** button (`···`, to the right of the tabs), and choose **Delete stack**. It asks you to confirm, then permanently removes the stack, its resources, volumes, and deployments.
## Next steps
Configure a resource, and pass values between resources without hardcoding them.
Give your app a database Stackdome runs and backs up for you.
What a deploy actually is, and how to roll one back.
The vocabulary behind everything you just clicked.
## What you have now
One stack, holding one resource, built from a commit in your repository and published at a hostname. Everything else in Stackdome is added to that shape: another resource beside this one, a volume for the data it keeps, environment variables to configure it, an addon for a database you would rather not run yourself. Editing a live stack works the same way as building this one did — change something on the canvas, and the pending edits collect as a draft until you press **Deploy** again.
Done experimenting? Open the stack, press the **Stack actions** button (`···`, to the right of the tabs), and choose **Delete stack**. It asks you to confirm, then permanently removes the stack, its resources, volumes, and deployments.
## Next steps
Configure a resource, and pass values between resources without hardcoding them.
Give your app a database Stackdome runs and backs up for you.
What a deploy actually is, and how to roll one back.
The vocabulary behind everything you just clicked.